Upgrade Update
So I took advantage of the beautiful weather today to go ahead and start the upgrades that I had mentioned last week.Here is the update and thoughts on each:
Cell Phone Mount
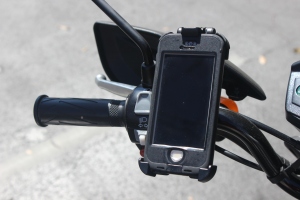
 My initial thought was to place the phone mount in the middle of the handlebars but I did not have the tools the remove the bars so that I could snake the mount under the bar. I ended up placing the mount to the left near the left hand grip which although doesn’t look as nice it does have it’s advantages. With this placement I have the ability to easily touch the phone with my thumb without removing my hands from the grip.
The original install looked as though it would not work out. Getting the clamp to come down solid so that it would not spin on the bars took quite a bit of work to get to clam. It also took even more work to get the ball joint to tighten to the point that it would not spin and tilt without trying to make it.
 The mount on the other hand is very solid and even has a lock so that it can not bounce free even though I haven’t noticed a need for it. I have been using this for about a week and am pretty happy with it. Below there is a link if you are interested in purchasing it, but keep in mind it will only work with a iPhone 5 or 5s using a Lifeproof case.
http://www.amazon.com/gp/product/B00C78W0ME/ref=oh_aui_detailpage_o01_s00?ie=UTF8&psc=1
Reflective Tape for Rims
 This was probably the hardest of the upgrades that I did. I have no complaints on the product but I could have done it on someone else’s bike before I did mine to learn what to do. Although I can point out every one of my mistakes I’m sure for the most part people will not notice it on a glance and I like the way it adds a bit of flare to the wheels.
The major thing that i will give as a hint on how to install the tape is to make sure you place it in the tool correctly and once that is done use the tool to gently guide it around the rim while pressing the tape in the place with a trailing finger. Also for the front wheel of a scooter you can place a box and in my case a empty bottle of Diet Coke to prop the front wheel up so that it spins freely. I’m not sure how you would do this without trying it but I wish you the best of luck.
http://www.amazon.com/gp/product/B002VY4IWE/ref=oh_aui_detailpage_o02_s00?ie=UTF8&psc=1
LED Tail Lights and Tail Light Cover with Integrated Turn Signals
The tail light conversion was probably the part I was most excited about. Don’t get me wrong, I do like the design of the scooter, but when looking at some of the customs that have been done I have wanted to see what I could make happen to mine. Below are videos of before and after (I appologize for the leaf blowers in the background)
Here is what it looked like stock:
Here is the new set up:
http://www.drowsports.com/koso-yamaha-zuma125-led-tail-light/
http://www.drowsports.com/dcr-yamaha-zuma-125-tail-light-cover-led-turn-signals/
So it’s been a pretty productive week… if only I had unlimited funds to be able to do everything I want to do to it.
Leave a comment